Mushroom Grow Bags
 Mushroom Grow Bags, particularly all-in-one grow bags, are the easiest and most practical way to grow mushrooms at home. They don’t take up a lot of space or make mess and their needs are pretty low. All-in-one grow bags are a great choice for beginners because the substrate has been sterilised and sealed in the bag, so the chances of contamination are significantly lowered. Using grow bags also allows you to grow several batches at one time, or several different mushroom strains separately. All-in-one mushroom grow bags are easily purchased, either locally or online. Yes, we sell them too.
Mushroom grow bags
There are various differences between mushroom grow bags (they can also be called spawn bags) in terms of size, how they are sealed, what size and type of air filter is built into them and whether or not they have injection ports. However, if you’re buying all-in-one bags the seller will have selected the right bag for you. Hopefully. If you buy empty mushroom bags so that you can do everything yourself from start to finish, you’ll also need to keep an eye on quality, as there are many cheap imports available online which suffer from poor quality, often resulting in split bags, contamination or at least wasted money. In this article we’ll look only at All-in-One Grow Bags as they’re perfect for home and hobby growers.
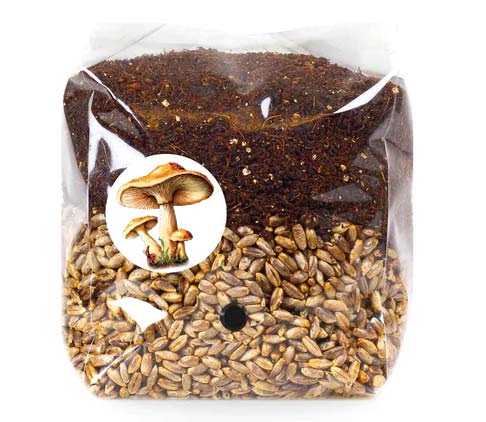
Although an all-in-one grow bag kit can mean different things to different sellers, the basic components are a sealed mushroom grow bag containing sterilised (or pasteurised) substrate, be that grain with coco coir, sawdust, straw, wood pellets or whatever, ready for innoculation. Many sellers include items such as a pair of nitrile gloves, a little micropore tape, alcohol wipes and a syringe (if one is not already supplied containing liquid culture). If it is a genuine all-in-one grow bag kit it will also include a syringe or perhaps bottle of liquid mycelium culture ready for injecting into the substrate to get colonisation started – the first stage of growing mushrooms at home.
Using All-in-One Grow Bags
Before getting started you need to ensure the highest possible level of ‘safety’ to reduce the risk of contamination from microscopic organisms in the air, on your hands and any equipment you are using. It’s no good blaming a supplier because your growth is contaminated if you contaminate it yourself. If you lack anything else and you’re doing this at home, find a clean room with still air, close it off and wait for the air to settle for an hour before starting.
Commercial growers use a laminar flow hood (or similar) to create an area where contaminant-free air blows over a workspace, but these cost hundreds of pounds to make (commercial versions can cost thousands) and are generally a step too far for hobby growers. One thing that can help reduce contamination risks at a low cost is a still-air box and these are quite easy to make (see our article on how to make a still air box).
You’ll need a supply of alcohol for cleaning surfaces (90% pure and above), alcohol wipes if you have them, a little micropore tape for covering the injection port after you use it, a ready flame and gloves (simple nitrile ‘surgical’ glove are good).
Clean, Clean, Clean
 Put on your gloves, clean them with a liberal splash of alcohol, then set your mushroom grow bag down and clean its outside thoroughly with alcohol. If the contents feel like a solid block, massage the bag gently (don’t touch the injection port or filter patch) to break up and loosen the substrate inside, which opens airways and allows mycelium space to grow. If it already feels loose, leave it. Keep the bag upright with nothing touching or blocking the air filter patch and the top unrolled (if it was rolled up) but STILL SEALED SHUT.
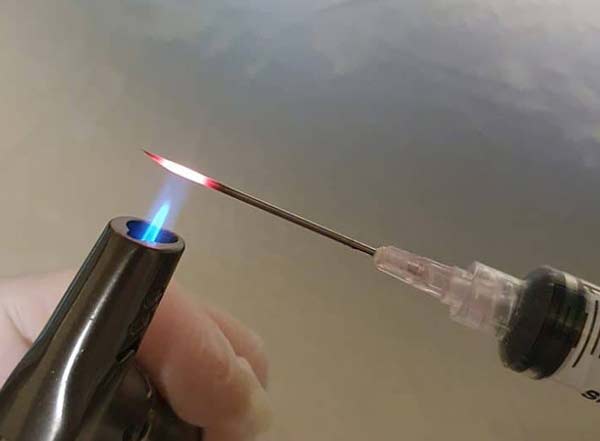
Take your syringe and wipe the needle with alcohol, then put it into your flame until the tip (only) is red hot, then rub it with an alcohol wipe (to cool it and remove any soot). The flame part isn’t essential if the needle came sterilised and sealed, but it won’t hurt. Next, push the syringe into the mushroom grow bag through the injection port and inject the required amount of liquid culture. Always in one go, move the needle around so you inject the liquid in different directions, to help it spread. Once you remove the needle, place a strip of micropore tape over the injection port. They are intended to be self-healing but a little extra safety never hurt anyone.
Most of the mushroom grow bags on sale will have the grain (which the mycelium grows into) at the bottom of the bag and the substrate at the top, and the injection port will hopefully be in the right place so you inject your liquid culture into the grain.
Gently tamp the bag down to slightly compact the contents and be sure the bag is stable. Then store your bag in a dark place where the temperature is likely to be stable – ideally between 20c and 27c (but this can vary between different mushroom types) and wait for the mycelium to colonise the bag. Leave the bag alone for a couple of weeks – don’t keep picking it up or disturbing the mycelium/substrate mix during this period. In this initial stage, store the bag away from light – when we started growing mushrooms at home we used to store our bags inside loosely closed cardboard boxes, as this meant we could store them more or less anywhere. Don’t put bags in a sealed container as the mycelium needs air to breathe.
Colonisation
 Depending on the strain of mushroom, the mycelium will have colonised the grain within 10-14 days, maybe sooner, maybe later. At this point, pick up the bag and use your hands to gently break up the substrate inside by squishing the bag and contents. As you do this you’ll be mixing the colonised grain with the substrate, which serves as lunch for the mycelium and gives it somewhere new to grow. Doing this too soon can cause the growth to stall, which is why you should leave the mushroom grow bag alone while it’s being colonised. No matter what, do not open the bag at this point. The process of breaking up the substrate stimulates the mycelium and encourages it to continue growing and colonise the remaining substrate.
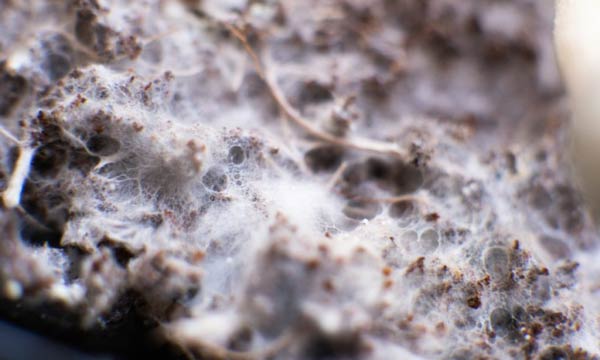
Fighting the urge to keep manhandling it, keep an eye on your grow bag over the next week or two and wait until the mycelium has colonised the entire contents of the bag. If it is healthy and not contaminated, the block will look fluffy, covered in white mycelium strands.
Ready to Fruit
Once the grow bag’s contents are fully covered in white mycelium strands, it’s time to let the mushrooms grow! To do this you can lay the bag flat and slice some x-shape holes in it or open the top. Alternatively, you could transfer the contents to a prepared monotub and let them grow in there. It’s worth checking up on the specific type of mushroom you’re growing to see what suits them best.You’ll need to start misting the mushroom block 2-3 times a day at this stage, as mushrooms and mycelium need moisture and although it was trapped inside the bag while it was sealed, it will now need topping up regularly. Mist the block, not the mushrooms themselves.
Either way, once the mycelium is ready to fruit, you’ll have to wait a while before the mushrooms start to sprout (again, the time will vary according to mushroom type). You can harvest the mushrooms by gently twisting and pulling them (careful to do as little damage to what’s underneath, to ensure further crops come up) out. You’ll probably get 3-4 flushes (crops) of mushrooms before the block is spent.