Liquid Culture for Mycelium
This article about how to make liquid culture is aimed at helping newcomers or enthusiasts who want to manage every aspect of mushroom cultivation, from start to finish. Using liquid culture is sometimes seen as being a process reserved for advanced growers but, although an expensive laminar flow hood is undoubtedly an invaluable aid, home growers can still produce their own with just a simple still air box to work inside.
What is Liquid Culture?
 Mushroom liquid culture refers to a nutrient liquid which is used to propagate live mushroom mycelium. Being simplistic, think of a liquid culture mix as free food and free temporary housing for your mycelium while it grows. Using a liquid culture is a safer and more efficient way to kick-start initial mycelium growth compared to simply inoculating your substrate/spawn with a spore syringe.
How is it used?
If you accept that the potential risks of inoculating your spawn/substrate directly from a spore syringe are high, and want to follow a slower but safer process, you will quite probably want to develop and isolate healthy mycelium through the use of sterile agar plates (aka agar petri dishes). Through the use of careful incubation and observation you will be able to spot contamination and transfer clean mycelium into fresh agar plates, eventually ending up with higher quality and uncontaminated mycelium. At that stage you can either take a slice of your healthy mycelium and add it directly to your spawn material, or add it to liquid culture in order to continue growing more.
Why use liquid culture at all?
If you took the trouble to use agar plates to ensure you have good quality mycelium, the use of liquid culture will provide you with a more or less unlimited supply of mycelium for future use – removing the need to continually buy more spore syringes or make spore prints. Mycelium transferred from agar plates into liquid culture will grow until the container is fully colonised and ready to incoulate your spawn. You can also inoculate freshly made jars of liquid culture with a sample of your now colonised culture to generate even more… So, not only does liquid culture help reduce the risk of contaminated substrates, it also means you can keep generating fresh mycelium more or less indefinitely.
How to make Liquid Culture
Liquid culture is a simple broth, like a sort of soup, consisting of water and a nutritious medium, generally sugar-based. Just as when you create agar mixes for petri dishes, using the correct ingredients and measuring them carefully is vitally important. There are countless liquid culture recipes in use and many growers have their own preferred cocktails, developed over time in a process of trial and error. To keep things short, we’ll focus on the two easiest and most commonly used recipes, which use (1) water and powdered light malt extract or (2) water and clear honey.
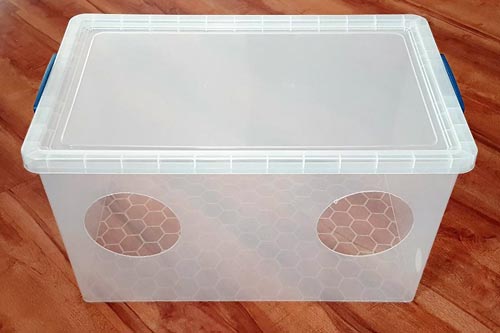
A very basic still air box
What you’ll need:
A laminar flow hood to work in front of and excellent sterile procedures*
OR
A good still air box and excellent sterile procedures*
Plus
A pressure cooker
Mason jars (or similar) with adapted lids**
Accurate digital weighing scales able to measure down to 0.1grams (or lower)
A magnetic stir plate (not strictly necessary but we’d never be without one)***
OR
A clean sterilised glass marble***
600ml hot water (to help dissolve ingredients)
(1) 1 gram powdered light malt extract
OR
(2) 6 teaspoons (24ml) clear honey
Spore syringe
OR
Live mycelium in a colonised agar petri dish and scalpel to slice and remove it with
*Sterile work space
Ideally, you will work in front of a laminar flow hood, which blows clean filtered air onto your workspace and the items you’re using. However, a decent sized hood will cost you in the region of £600 or more (cheaper ones are available but their performance is likely to be as low as their price). A cheaper and commonly-used alternative is a simple ‘still air box’ or ‘glove box’ (same thing, different names). These are little more than upside-down large plastic containers (sometimes called tote boxes, or monotubs in the mushroom world) with arm-holes cut into the sides – although they can’t clean the air for you, they do at least stop air circulation (provided you don’t move your arms around too much). You can still create liquid culture without either of these things (many people do) but you want a room with still air – no drafts or open windows – and a workspace that is spotlessly clean. Disposable nitrile gloves and a quality facemask to smother your breath should also be considered essential.
**Mason jars
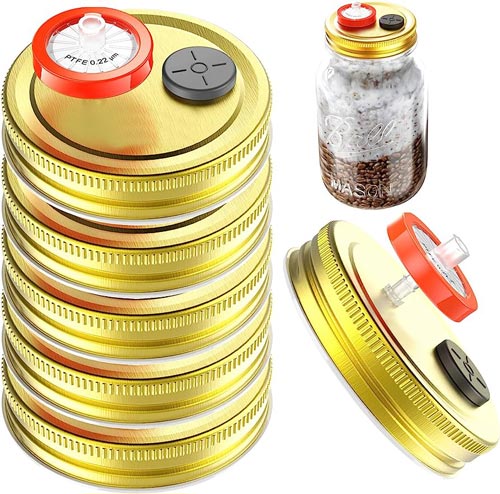 Mason jars (aka ‘kilner’ jars) tend to be the most popular type to use in relation to liquid culture production. They’re cheap, easily obtained, come with a convenient 2-piece screw-on lid and are normally safe for use in pressure cookers. Jar lids need to be adapted for use with liquid cultures and require a filter-covered hole or port to allows air/gas exchange, plus an injection port for getting liquid in/out with a syringe. You can easily adapt lids yourself or you can just buy jar lids with built-in self-healing injection ports and syringe filters already fitted.
***Stirring
Liquid culture needs to be regularly stirred after pressure cooking to help the spread of mycelium and also to stop it developing into clumps. If you have a magnetic stirrer you can add a sterilised stir bar (a capsule-shaped metal ‘flea’ with a raised waistline to help it spin) prior to pressure cooking your jars. As an alternative, some people use glass marbles which can then be used to manually shake up your mix.
Liquid Culture Recipe
The standard recipe for light malt extract liquid culture is 1g Light Malt Extract to 600ml of water. This nutrient mix produces a clear solution for your mycelium to flourish in. For the honey recipe, substitute the malt extract with 6 teaspoons (approx 24ml) of clear honey in the same volume of water to do the same job. Beware: adding too much nutrient can stifle or kill mycelium just as easily as adding too little, so don’t try eye-balling quantities.
Process
1) As always, ensure your workspace and surfaces have been fully sanitised before you start. Keep a good supply of 70% cleaning alcohol and/or alcohol wipes handy at all times. It may sound over the top but clean clothes, nitrile gloves and even a medical-type face mask are also advisable along with sterile coverings for your arms – who knows how many skin cells, hairs and loose dust can fall from them onto your work?
2) Once prepped, fill a jar with 600ml of water (distilled if available, bottled if not, and tap if necessary). Then add either your malt extract or honey, as per the recipe quantities shown above. Gently stir the mixture until the nutrients have dissolved. A magnetic stirrer is handy, but both malt extract and honey dissolve without too much trouble.
3) Once your mix has dissolved, replace the lid and tighten about 75/80% and cover it with tin foil (to protect the jar lid/filter from water ingress during sterilisation), wrapping the foil around the lid and top half of the jar, then place it in your pressure cooker. If you plan to use one, add your stirring marble or stir bar to the jar before doing this as you don’t want to open it again after sterilising it. Turn on the heat until the pressure reaches 15psi, then allow it to simmer for 30 minutes (at a constant 15psi). Once finished, allow the the pressure cooker to fully cool down before opening it. The warmer it is inside the pressure cooker, the more cold (and potentially contaminated) air gets sucked in when you open it. You cannot use liquid culture until it is at room temperature so don’t rush things. Have patience…..

Spore Syringes
4) Once fully cooled, move to your freshly cleaned work area. We prefer to leave sterilised jars (etc) inside the pressure cooker and open it as near to a flow hood as possible, removing the jars and immediately placing them in front of the flow hood, so they are exposed to as little ‘normal’ air as possible.
5) If using a spore syringe, it won’t need to be further sterilised if it is correctly removed from its pack and if the needle was also in sterile packing that too will also be safe to use straight away (but quickly to avoid contaminants in the air landing on the needle). However, before opening them, wipe both needle and syringe packing with alcohol.
If you’re using a needle that has been used before, you must sterilise it by heating the needle to red hot (a bunsen burner or mini butane blow torch is ideal) then clean and cool it with an alcohol wipe before using it. Then, connect needle and syringe, push your syringe into the port on top of the jar and inject around 1–2ml into the liquid.
OR
6) If using an agar plate, unscrew the lid of your jar but keep it in place. Then open the petri dish with one hand and using a scalpel in the other, cut and lift out a slice of suitable mycelium, shut the petri dish (if you plan to use it again), quickly lift your jar lid and drop the mycelium inside, then immediately shut the lid tightly – the only air you want to entre the jar in future will be via the lid filter.
7 – Incubation) That’s the hard work done. You now need to keep your liquid culture jars at a consistent temperature of around 18–20°C / 64–68°F and leave them to settle for a few days. After this point, you’ll be able to see the first mycelium growth starting and your jars will need a daily stir to make sure the mycelium doesn’t become clumped or too cloudy. This can be done by hand or by using your magnetic stir plate.
Finally, colonised liquid culture
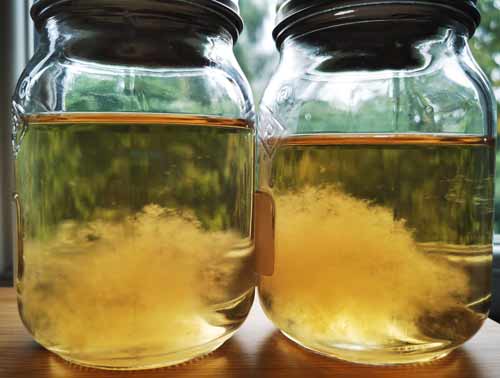
Healthy mycelium growing
If all is good, your liquid culture mix will slowly start to show signs of mycelium growth after a week or so and generally takes between 10-20 days to accumulate a rich enough culture to be used for spawn inoculation. The liquid should be clear – you should be able to see through the jar – and inside the liquid you want to see thousands of wispy mycelium growths. Regular stirring – but not excessive – of about 10 minutes a day should prevent large clumps from forming (remember you need to be able to suck the liquid out with a syringe).
Spoiled culture – the most common signs of contamination are if the liquid is cloudy and you can’t see through it (judge this about a week after inoculation as sometimes the cloudiness fades), if the liquid gives off a foul smell or has a greenish layer of scum floating on top after it has been left to settle for a few days, or if the jar feels pressurised (this will be from excessive gas created by contaminants).
Healthy liquid culture can usually survive at room temperature for up to 6 months or until the nutrients in the culture have been used up. Putting your containers into a fridge will help it last longer – for years, apparently, although if you’re not going to use it for years why create it in the first place?
How To Use Colonised Liquid Culture
Once your liquid culture has matured and looks healthy, you can think about extracting it from the jar to use it to colonise your spawn/ substrate. However, you took a fair bit of time and trouble to reach this stage, so don’t you want to make sure your liquid culture mix is good and healthy before using it to inoculate your substrate? You should.
Testing Liquid Culture
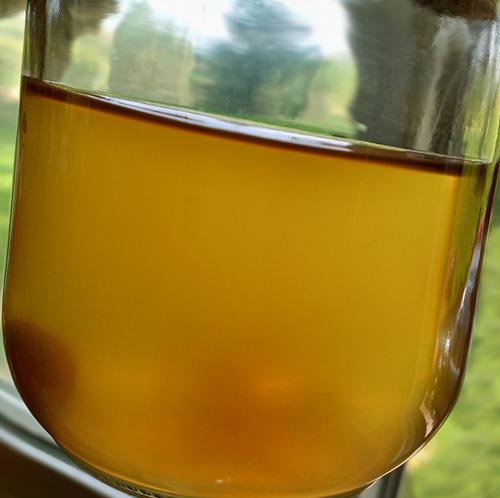
Contaminated liquid culture
Following all the sterile techniques mentioned previously, you prepare one or several freshly-made agar plates and a new sterile syringe and needle (16 or 18 gauge work best). Extract a small quantity of your liquid culture (giving it a good stir to make sure what you suck out includes mycelium and not just nutrient liquid) and spread a few drops onto your petri dish (using several petri dishes is the best idea). Seal the petri dishes as normal and then let them incubate for a few days to see what happens. What you want to see is nice clean mycelium growth. If you did everything correctly up to this stage, that’s what you should see and it means you’re good to go.
If your petri dishes show signs of contamination, it’s bad news. To be sure you didn’t add the contaminants yourself, repeat the process of removing liquid culture from your jar and inoculating some fresh agar/petri dishes and see if the result is the same – but this time be as OCD as you can with your cleanliness. If you still see contamination, dump the contaminated mixture and start afresh…… This is why creating multiple jars of liquid culture is a good idea – one spoiled jar from 5-6 is no big deal but if you only used one jar in the first place……..
Don’t take contamination personally. It happens, even in high-tech commercial labs. It just means you need to be extra careful next time. Nothing works 100% of the time for 100% of people. Under or over-doing the amount of nutrient you add can kill the mycelium, not keeping the temperature right can do the same. The smallest lapse in sterile working can introduce contamination and, if you made your liquid culture by injecting spores directly into it, the contamination could well have come from that. It’s not at all uncommon.
Be clean and be patient, and you’ll eventually be lucky too.