Monotubs for fruiting Mushrooms
Monotubs can be very handy when used for fruiting mushrooms. Once mycelium has fully colonised your grow bag and it’s ready to start fruiting (growing actual mushrooms) it’s finally safe to expose it to air – indeed you need to expose it to air for the mushrooms to start growing – you have the option of transferring the contents of your grow bag into a larger container – a fruiting chamber or monotub. Using a monotub means you can usually hold multiple grow bag contents in the same container, making misting and storage less complicated than dealing with multiple individual bags.
Monotubs can also be used for the spawning process but for now we’re only talking about using one as a form of fruiting chamber.
Monotubs
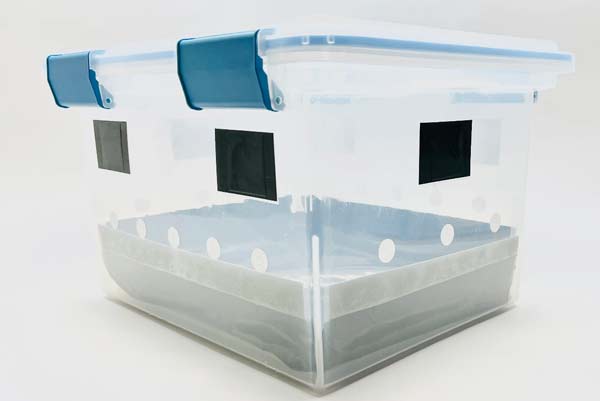
Example of a monotub
What are monotubs (sometimes called fruiting chambers)? Quite simply, the term describes tupperware-style plastic storage tubs with lids that have been converted for use in growing mushrooms. The type of storage tubs you see for sale in supermarkets and so on. They’ll be transparent so you can see what’s going on inside and will have lids that can be securely closed/attached. When converted for cultivating mushrooms, the tubs will have a series of small holes cut into the sides, which may have filters or micropore tape covering the holes (allowing filtered air to enter the tub). They may have a blacked-out layer at the bottom (typically spray painted) or a liner of some sort which aims to stop unwanted growths occurring around the sides or under the surface. However, as you’re only putting fruiting blocks in the container, as described below, the blackout layer is redundant and unimportant.
These custom converted monotubs can be purchased online or you can make your own quite easily. Buy one that’s bigger than you think you need and be sure it’s plenty deep enough to avoid limiting the volume of air inside and to ensure your mushrooms aren’t inhibited by hitting the ‘roof’.
Propagators
Alternatively, at slightly higher cost, you could fruit your mushrooms inside a propagator, normally used for germinating plant or flower seeds. Purpose built propagators will have some form of venting system built-in and some will also have heating elements, enabling you to maintain a stable temperature inside the box – which is cheaper than having to heat a whole house or room in colder months. Just make sure you find one which is the right size – particularly in terms of height.
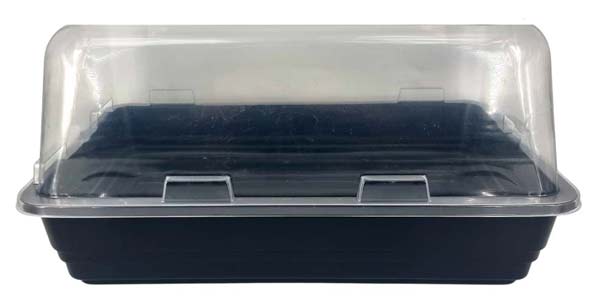
Example of a propagator
As you’ve used grow bags for spawning and to cultivate your mycelium, which is now ready to fruit mushrooms, you don’t need to worry half as much about contamination. However, it doesn’t hurt at all to thoroughly clean the inside and lid of the box with alcohol because you never know what’s lurking in even new and unused boxes and the cleanliness habit should be part of all your dealings with mushrooms and mycelium.
The monotub fruiting process
Buy yourself a bag of perlite from your local garden centre (it comes in big sacks and you don’t need to use a lot at one time) and be sure to have a wide roll of aluminium foil to hand. Pour a layer of perlite into the bottom of your monotub, 2 inches or a little more will be enough, and then hydrate it with distilled water. Stir the perlite to ensure it is all equally hydrated – you want it damp, not soaking and without pools of water in the tub. Distilled water is preferred as there may be chemicals in your tap water that will affect your growth. The humidity this will create is what mushrooms need to grow.
Place a sheet of aluminium on top of the perlite and then get your grow bag. Cut open the bag and carefully slide out the mycelium block onto the foil sheet. Apart from making sure it’s stable, try not to disturb the block, leaving it in place intact. If you have multiple bags, do the same with them. Keep individual blocks away from each other, allowing breathing, growing and harvesting space around them.
Once done, mist the sides of the monotub so that small water droplets form and start working their way downwards. You can also mist the blocks themselves, but avoid overdoing it – you don’t want to see water droplets sitting on the surface. Your aim is not to ‘water’ the blocks in the way you water plants, but to maintain sufficient humidity levels inside the tub for mushroom growth. Then close the lid and store the monotub somewhere where it can enjoy 8-12 hours of indirect light a day (ie not in direct sunlight) and where the temperature will remain stable. The direction of light will affect the direction of growth.
To encourage growth you need to provide fresh air exchanges 3-4 times a day (lifting the lid to fan air inside works). Some hobby growers simply leave the lid very slightly ajar, to allow air to be exchanged naturally. What you do depends on your circumstances. Importantly, you should continue to give the sides a light misting 2-3 times a day. Once you can see the beginnings of mushroom growth (called pins) stop misting the blocks and only mist the monotub sides. If you mist the mushrooms you increase the risk of mould.
Typically, but varying according to the type of mushroom, you should have a crop ready for harvesting after around 10-14 days. In most cases, you should harvest mushrooms before the caps have flattened out, but exactly when is up to you.