Make your own bulk CVG substrate
Learning how to make your own bulk CVG substrate isn’t terribly difficult and might help you save a little money if you plan to grow mushrooms regularly. Obviously, it’s easier to buy CVG substrate ready-made and if you choose to do that you’ll at least know it has been properly prepared, is free of contamination and has the right level of moisture content.
Making your own CVG substrate at home requires only a few pieces of equipment, a pressure cooker being the most expensive item.
What is CVG Substrate?
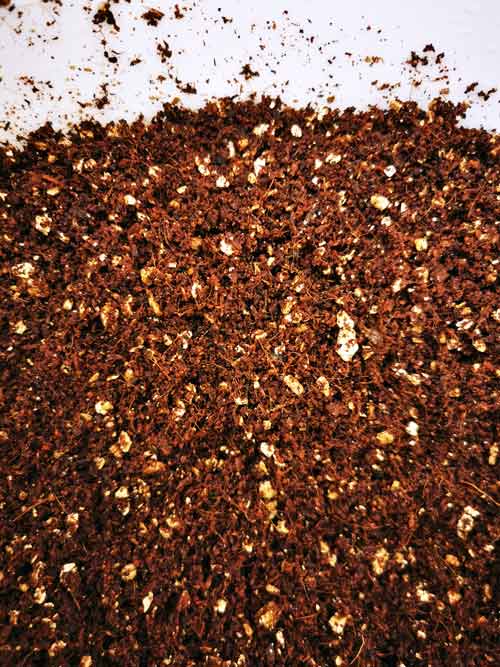
A CVG substrate is a simple mushroom substrate (think of it as similar to peat, if you like) which is made of a blend of coco coir, vermiculite and gypsum, pasteurised or sterilised and hydrated to the correct level, ready to be used for growing mushrooms.
CVG substrates are suitable for coprophilous mushrooms, otherwise known as manure-loving mushrooms. Included in these are psilocybe (aka magic), button and portabello mushrooms.
Used along with sterilised rye grain, or similar cereal grain, a substrate is what your mushrooms can develop and grow in. Think of it as free food and accommodation for your mycelium! Although mycelium will colonise your substrate, the essential food it needs comes from the grain itself.
Grain and CVG substrates are normally used in purpose-made mushroom bags or in monotubs. If you’re looking for larger crops, monotubs are the way to go as they provide a much larger space for growth.
Should I Sterilise?
The answer depends on who you ask and what you plan to do with the substrate. If you’re going to put it into a monotub and then add pre-colonised grain spawn, sterilising isn’t really necessary and many home growers follow a ‘bucket tek’ method of pasteurising instead. However, if you’re making up grow bags with grain and coir substrate, you will need to sterilise the substrate along with your grain.
Whether you plan to prepare bulk substrate for a monotub refill or make your own mushroom grow bags, the basic process is the same up to the point where you either use it pasteurised in a monotub or add it to grain and sterilise it. So the process below is valid for all uses.
Bucket Tek
There are more variants of this than there are manufacturers of fake fashion products in China, but this is the simplest version. Bucket Tek is just a sad and rather nerdy way of saying ‘use a bucket’. The recipe below can be scaled up or down depending on the amount of substrate you want to make.
To make the maths easier, we’ll base the recipe on you using 1Kg of coir. Many people buy small 650g coir ‘bricks’ but if you’re making substrate in bulk it makes sense to buy larger 5Kg blocks and carve off what you need.
You need:
1000g of coco coir
350g of vermiculite
150g of gypsum
4.75 litres of boiling water (standard recipe is 5.25 litres, but see below)
A large plastic tub with sealable lid
What you do:
1 Boil your water.
2 While you’re doing that, break up your coir in your tub/bucket so that you have no big chunks left (smaller they are, easier it is to hydrate evenly). Mix in your vermiculite and gypsum, giving it all a good mix so it looks even.
3 When the water boils, pour it slowly onto the coir, trying to ensure it hits every lump or block and that all parts of the coir have been soaked. As you pour, you’ll see the coir start to puff up and expand. When you have maybe a litre left pause and, using a strong long-handled stirrer, give the steaming mix a good stir, digging down into the bottom edges. You want to dig up any dry material and mix it with the rest. Now pour the rest of your water, stirring again when you’re done.
4 Now put the lid on your bucket and seal it tightly.
7 If you have some, it doesn’t hurt to wrap the bucket in towels to insulate it and keep the heat inside.
8 Leave for an hour or so, then open up and give it another stir, keeping an eye open for any dry lumps.
9 Seal up the tub again and leave the substrate in the tub until it cools to room temperature.
10 Check for moisture level. Take a handful of substrate and squeeze it in your hand. You only want to see a few drops of water come out of it when you squeeze hard, not a trickle. If you added 4.75 litres of water initially and your mix is too dry, boil a little more water (500ml) and slowly add some or all of the water until the moisture level is correct. Reason for doing this; it’s easier to add extra water to a dry mix than dry out a mix that’s too wet.
Field Capacity
You’ll read or hear people talking about substrate ‘field capacity’. That refers to testing the moisture content of the substrate – how much water is in it. The standard test is to squeeze a handful of substrate and see how much water comes out. A strong squeeze should see a few drips, NOT a stream of water. It’s worth noting that most people who buy CVG use it for specific strains of mushroom and, for those, a moisture content of around 60-70% is generally recommended because it gives the best results. When we produce the CVG substrate that we sell, we always aim at 70% moisture content.
Test it and know for sure!
Testing substrate moisture content isn’t hard. You’ll want some accurate scales, capable of showing 0.1 gram measurements. Find a microwave-proof container, put it on your scales and weigh it. Now add 100g of your substrate. Put it in your microwave for 2 minutes. Let it rest for a minute, then cook it again for another 2 minutes. Repeat this until the substrate is crispy dry, more or less a powder without a hint of moisture. Now weigh what’s left.
Let’s say your container weighed 200g when it was empty and you added 100g of substrate. When you finished microwaving it, the total weight of the container and substrate was 232g. If you subtract the weight of the container, it means your bone dry substrate with all water removed now weighs 32g. That means that 68g of the original 100g substrate was water – in other words, your substrate has a 68% moisture content. You might call that almost perfect.
To adjust the levels you can use a fine spray to add a little more water to the mix or, if the moisture content is too high, you can stir in a little vermiculite to absorb some of the water.
Moving on..
Once it has cooled to room temperature, you can use the substrate in your monotub. If adding it to a grow bag, you’ll want to sterilise it.
Sterilising CVG Substrate
If you’re making your own grow bags you’ll want to sterilise your substrate. So, after completing the process above, you follow the process below.
To sterilise:
Measure your substrate into the bags you want to sterilise it in, adding it to the grain you will later inoculate with liquid culture or spores. The bags must have at least a filter patch and will want some form of injection port (these will either be built into the bag or can be added after sterilisation. Bags should be filled and then folded. We use high-temperature tape to hold the folded flap of the bag down and stop it puffing open.
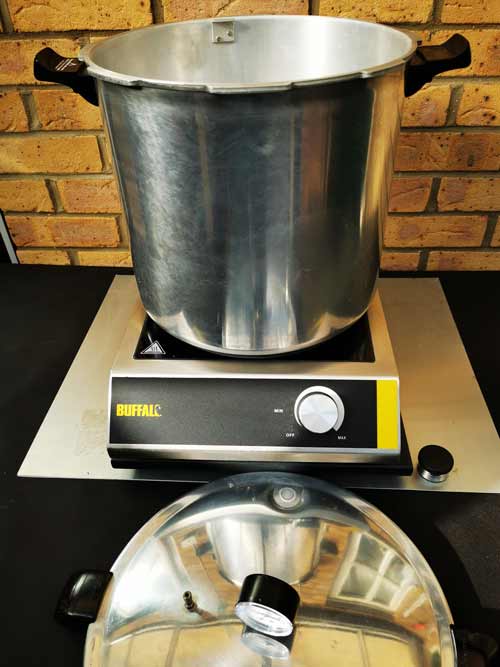
Put your bags into your pressure cooker and turn it on. When it hits 15psi turn on a timer for 1.5 – 2 hours depending on bag sizes and numbers.
When finished, allow the pressure cooker to cool down to room temperature – don’t try to speed it up. When cool, remove any bags carefully and gently unfurl the folded top without opening it. Place it in your impulse sealer and seal it. If the seal isn’t perfect, do a second seal to be on the safe side.
Don’t try inoculating your substrate until it is 100% room temperature, otherwise you’ll kill your mycelium.
Too much like hard work?
If you’re looking for an easy life, we totally understand. That’s why we sell bags of sterilised CVG substrate on our ‘mushroom kits‘ sister website!